- • iMovie tutorials
- 1. iMovie alternatives
- 1.1 iMovie Alternatives for Windows
- 1.2 iMovie Alternatives for Mac
- 2. Basic editing tips for iMovie
- See more
- 3. Advenced editing tips for iMovie
- 3.1 How to add video effects in iMovie
- 3.2 How to add transition in iMovie
- 3.3 How to fade in fade out audio in iMovie
- 3.4 How to use green screen effects in iMovie
- 3.5 How to use PIP effects in iMovie
- 3.6 How to make timelapse/slo-mo video in iMovie
- 3.7 How to get more iMovie themes
How to Use Picture in Picture Effect in iMovie
Jan 04,2019• Proven solutions
Picture in picture is a feature of video that plays in a small window on top of another one. The iMovie picture in picture effect is usually applied to create special video effects, like showing someone is narrating the scenes happened in the main clip, or to show something else is happening at this moment.
iMovie gives you full option to use this advanced picture in picture effect. Drag videos to iMovie and open your iMovie project, then follow the steps to learn how to create picture in picture in iMovie.
Need to add PIP in your Windows PC, use the Best iMovie Alternatives for Windows to accomplish it.
- Part 1: An easier way to add picture in picture effect to video
- Part 2: How to use picture in picture effect in iMovie 9/11
- Part 3: Add and adjust picture in picture effect in iMovie 10
Part 1: An easier way to add picture in picture effect to video with Filmora

To make your own picture in picture video in Mac, other simple and good-to-use video editing software - Wondershare Filmora for Mac- is highly recommended. It supports adding picture in picture graphics or videos to overlay tracks for decorating your movie. Beside this feature, it also has other common editing effects such as trim, crop, split, add text, sound, transition, intro/credit, mosaic, tilt shift, face off, jump cut at beat, etc. to videos.
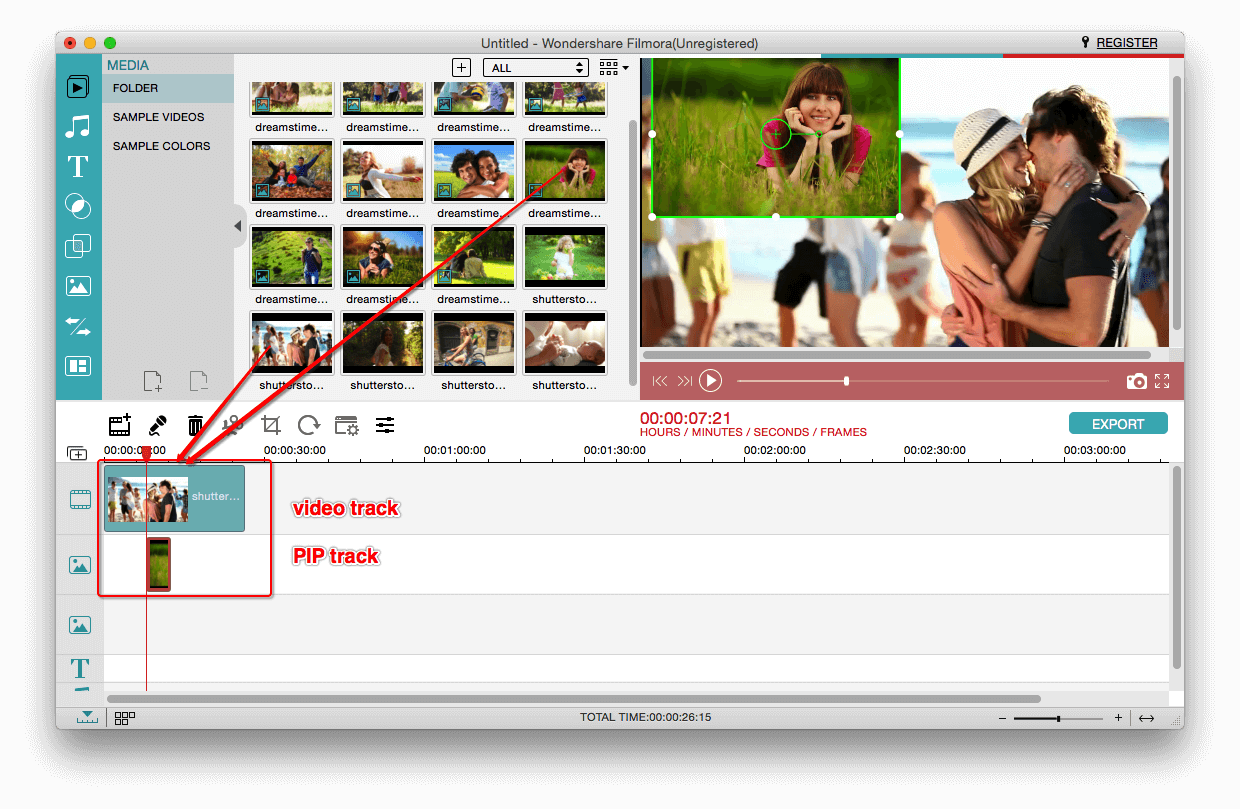
Step 1. Place your videos on the timeline
Import your media files to Media Library by choosing "File" > "Import Media" or directly drag them to the program. Drag-n-drop the primary video to Video Timeline, and then drag the video or picture you want to add to the primary video to the PIP tracks. Now you can move them to the right time when you want them to show up, or trim and extend their length to adjust the lasting time by dragging the indicator.
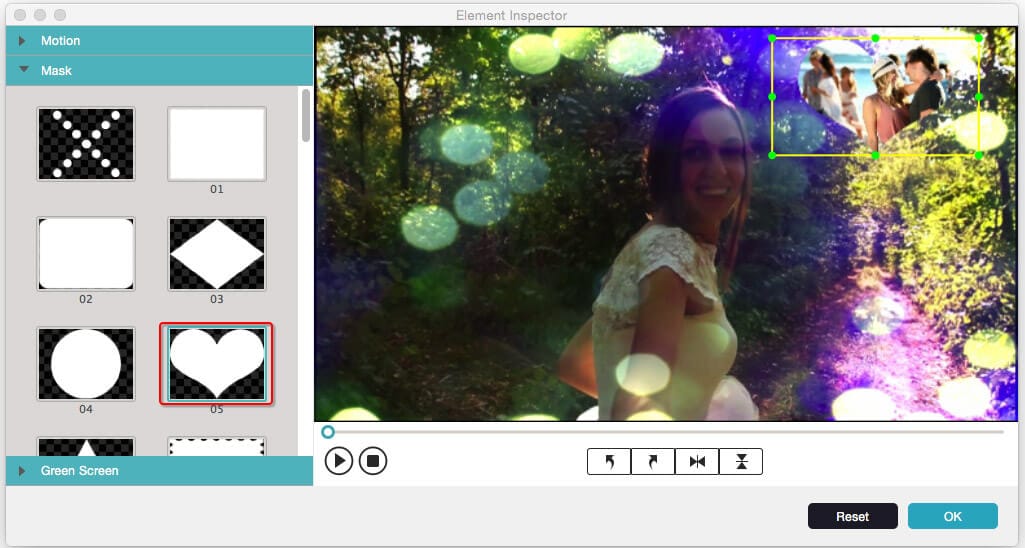
Step 2. Personalize your PIP video
Now you can customize your PIP video. Double click the video or picture in the PIP track and the PIP Inspector will pop up. On the right part of the window, you are allowed to adjust the size of the PIP video or picture by dragging the its edge, and move it to any position you like. And on the right part of the window, you are provided three editing options: Motion, Mask and Green Screen. You can go to the respective tab to add the effect you want.

Step 3. Save your video
After finished the above operations, you can preview your PIP video by clicking the play button. Then hit on the Export icon to save your video to Mac, mobile devices, DVD discs or directly upload it to YouTube and Facebook. Watch the video below, see what Filmora can do for you and download it to try.
Learn more detailed information about How to Make a Picture in Picture Effect Easily
Part 2: How to use picture in picture effect in iMovie 9/11
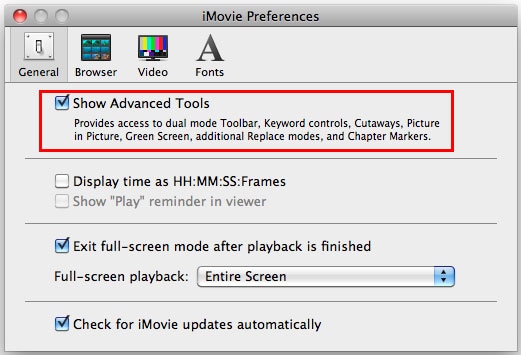
Step 1. Turn "Show Advanced Tools" on
To activate iMovie picture in picture effect, Advanced Tools must be turned on. You can go to iMovie Preferences, and click "General", and then you will see a popup window as below. Select "Show Advanced Tools" to turn it on.
Browse to find the music you want to use in your project or you can use the Search field to find the audio file you want by name. You can add music clips from your iTunes library directly.
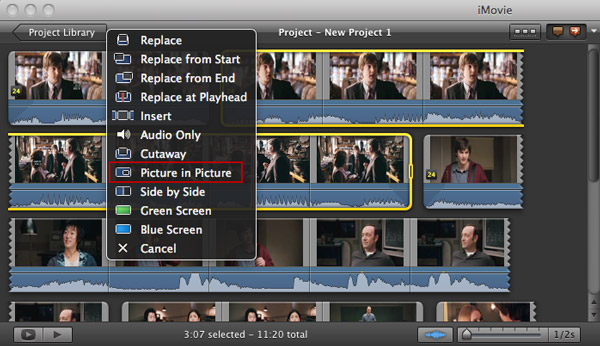
Step 2.Select a video clip that you want to use as a picture in picture
In the Event Browser, choose a video clip that you want to apply as a picture in picture clip and drag it to the Project Library on where you want to add your picture in picture. And a menu will pop up, choose "Picture in Picture" to apply video picture in picture effect in iMovie.
You may also need: Add watermark to video in iMovie to protect your video
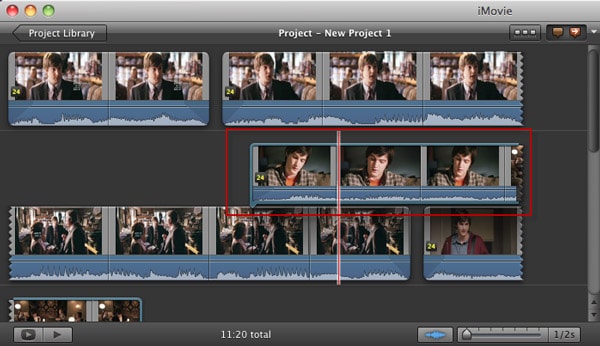
After then, the picture in picture clip will appear above the video in the Project Library like below. If you want to change the position of the picture in picture clip, you can simply drag it to another video clip. Furthermore, you can drag to extend or shorten the iMovie picture in picture clip.
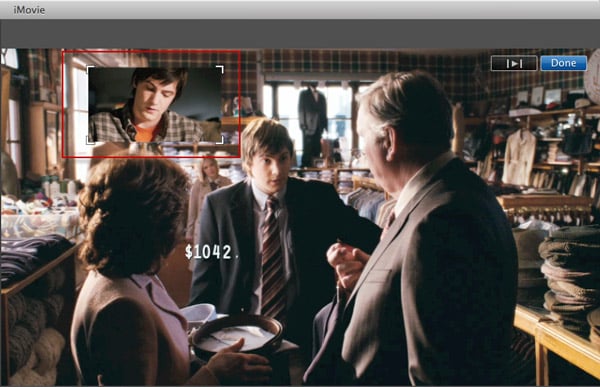
Step 3. Preview and adjust iMovie picture in picture clip
Press the Spacebar to have a view of the iMovie picture in picture clip. When you are previewing the picture in picture clip, you can drag the frame to change the picture in picture clip display size to achieve a better result.
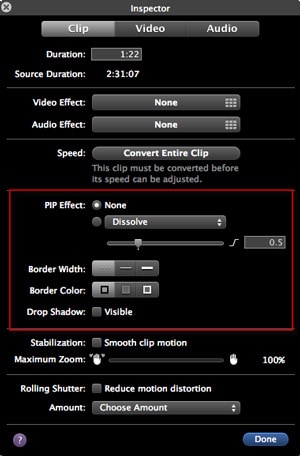
Besides, more functions of iMovie picture in picture effects are provided. Double-click the picture in picture clip or right click on the small Action menu on the clip and select Clip Adjustments, and an "Inspector" will pop up. Here you can set the way the iMovie picture in picture clip shows, the border width and color, etc. to make it best suit the video.
You may also like: How to split screen (side by side) in iMovie
Part 3: Adding and adjusting picture in picture effect in iMovie 10
If you are using iMovie 10 version, you will find the above steps of adding PiP effects to video in iMovie is not suitable. Don’t worry, below are the steps about how to add and adjust the Picture in Picture in iMovie 10.
Drag the clip or image that will be used as a Picture-in-Picture frame and drop it above the background clip in the timeline.
1. Click the Video Overlay Settings icon and in the pop-up interface click the Picture in Picture option from the drop-down box.
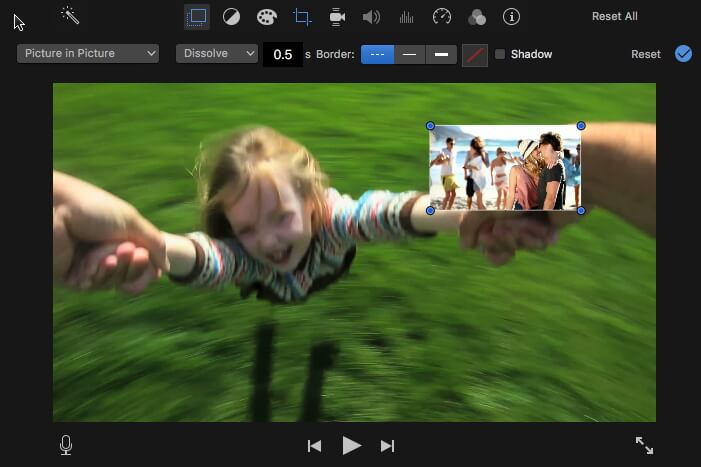
2. You can now adjust the PiP effects:
Choose the transition style for the PiP clip among Dissolve, zoom, and swap. When you choose Swap, the background/main clip will transform to the PiP window. You can also adjust the duration of the transition effect by entering a value in the field.
You can drag the corners of the PiP frame in the Viewer to resize the PiP window size and position it to anywhere you like. iMovie also allows you to add shadow to the PiP window and set the borders to make it more visible.
3. Click the Apply button to save the changes and apply the PiP effect.
You may also like: How to Add Picture to Video
Bring up your video to a professional level with straightforward tools.
Try It Free Try It Free


Liza Brown
chief Editor
0 Comment(s)